*Note: Fields that are marked with a red checkmark ( ) are required fields.
- Click on the New Trip Request tab.

Booked By
- The Booked By section will be filled in with your contact information.
Booking Details
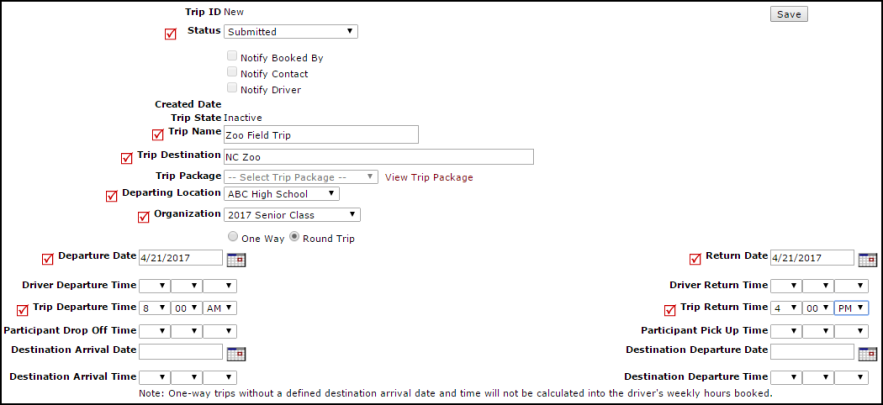
- The Status will default to Submitted for a new request. You can enter a request in the Approved status by selecting Approved from the drop down box. This will check the Notify Booked By, Notify Contact, and Notify Driver boxes. If you do not want these email notifications to go out, uncheck the boxes.
- Enter the Trip Name and the Trip Destination.
- If you are entering a frequently taken trip, you may be able to select it from the Trip Package drop down list.
- Select your Departing Location and the Organization taking the trip.
- Choose if your trip is One Way or Round Trip.
- Select your trip Departure Date, Departure Times, Return Date, and Return Times.
Trip Contact
- If you are the Trip Contact, check the box to populate the fields with your contact information.
- If you are not the Trip Contact, enter their information in the fields.
Attendees
- Enter the Number of Students attending the trip and any other necessary information.
Categorization
- Enter the Budget Code if needed, along with any additional information.
Notes
- Enter Special Needs and/or Trip Requirements and include Driving Directions if needed.
Required Service
- Select the Transportation Type of the vehicle needed for your trip from the drop down list and enter the Number Of Vehicles needed.
- If available, select the Food, Maintenance, and IT Services needed for your trip.
Approval
- Click Save to send the request to the next user in the automatic routing process.
- If you need to manually route this request to another user, select their name in the Route To Next drop down and click Save.
- If you are the final user in the approval process, check the box next to Activate Trip Request? and then click Save.
